
Navigation
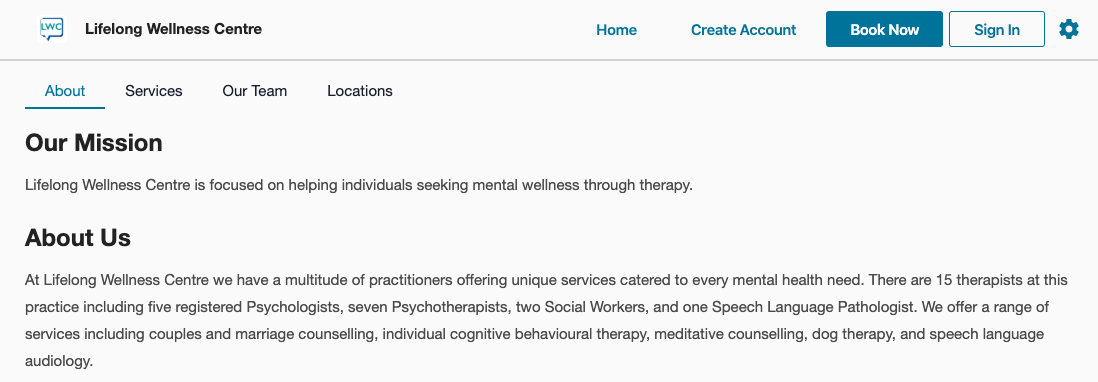
There are four main tabs clients can click into at the top of the Client Portal: Home, Book Now, Messaging, and My Account.The Home page is where clients can learn more about your practice, they’ll see all of the information you want to provide about your practice on this page. Clinics can use this aspect of the Client Portal to supplement a website if they do not yet have one.
For accessibility, clients can easily enable a High Contrast Mode on their view when using the site which will assist them with visibility if needed by changing the colours to black and white:

The Messaging section will take clients into their Secure Messaging conversations and from here they can continue secure messaging with their clinic.

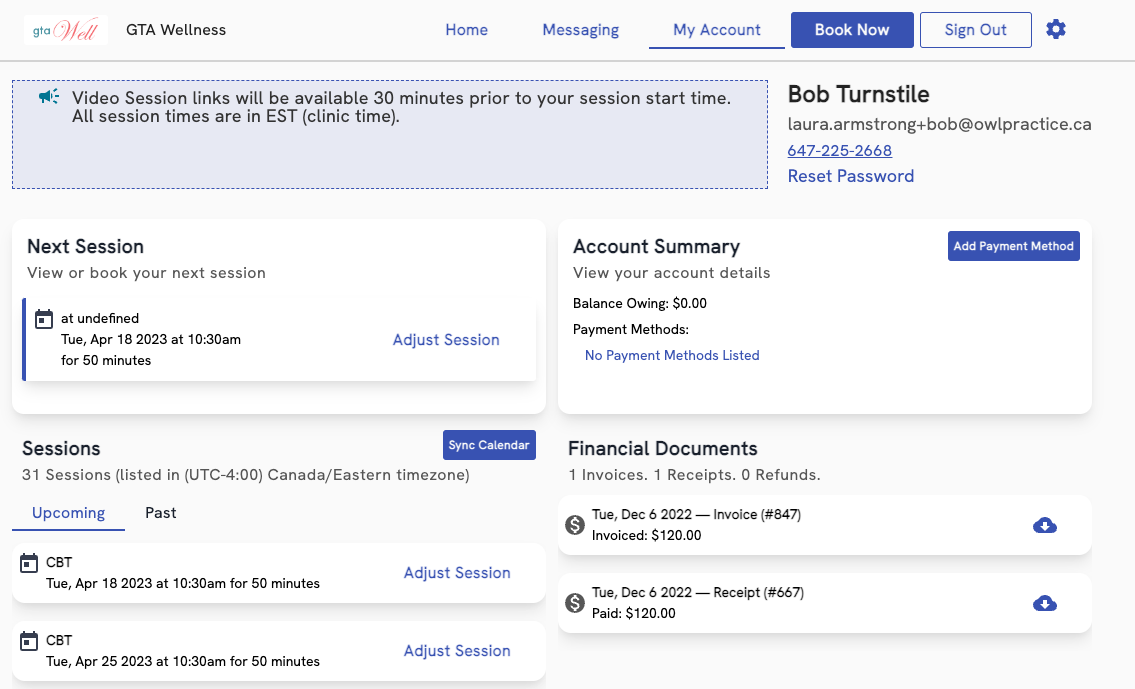
The My Account area is where clients will find their session history and see their next upcoming session, if one has been booked. If you accept Credit Cards through Owl’s Stripe integration and you have enabled card capture upon booking, this is also where clients will see any cards on file and have the option to add new cards.

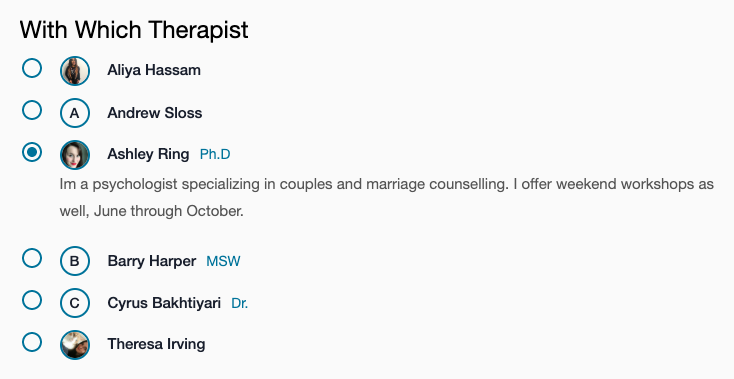
The Book Now section allows the clients to choose their therapist, location, and service to make bookings. This booking experience has been refined to give clients more flexibility when booking. When a client chooses a certain service, the therapist listing will be filtered to show only the therapists that provide that service. And vice versa, when a client chooses a certain therapist, the services listing will be filtered to show only the services that the given therapist provides.
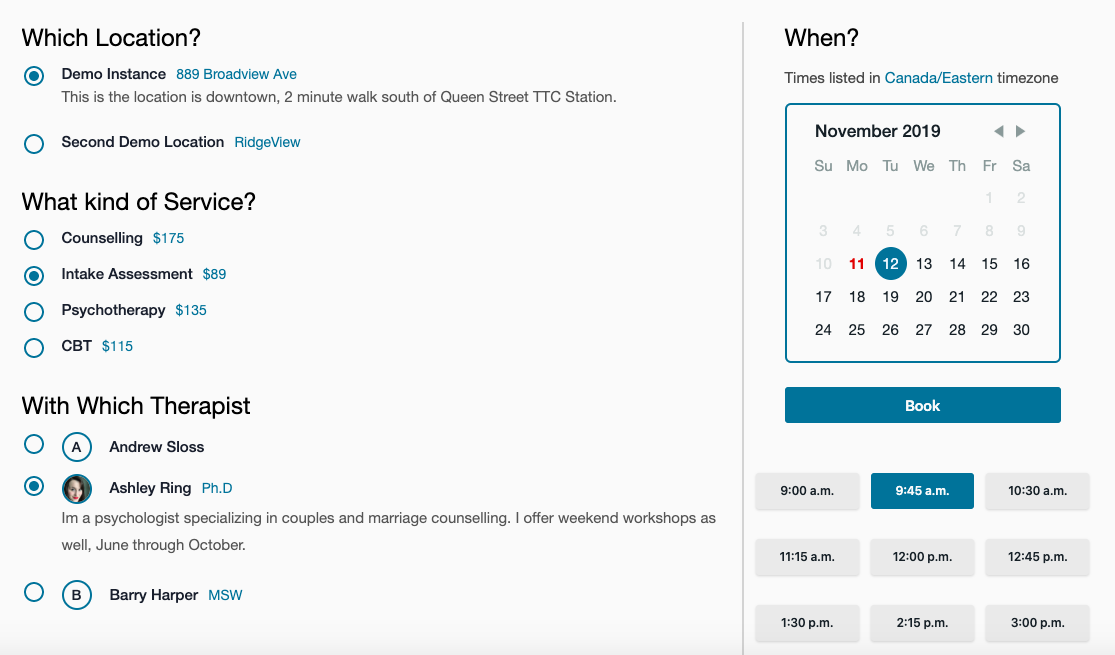
When the client clicks on a date in the calendar provided, available times will appear beneath it. The client can then choose the time they prefer and the Book button can be clicked to confirm the appointment. The client will be prompted to confirm their booking to have it officially scheduled.
Settings
Owl has made it easy for you to customize the Client Portal homepage so you can share more about your practice with clients and prospective clients alike. This area called the Home Page can be fully customized using title and content blocks. You can edit the information that appears on this page by going to Settings > Client Portal > Home.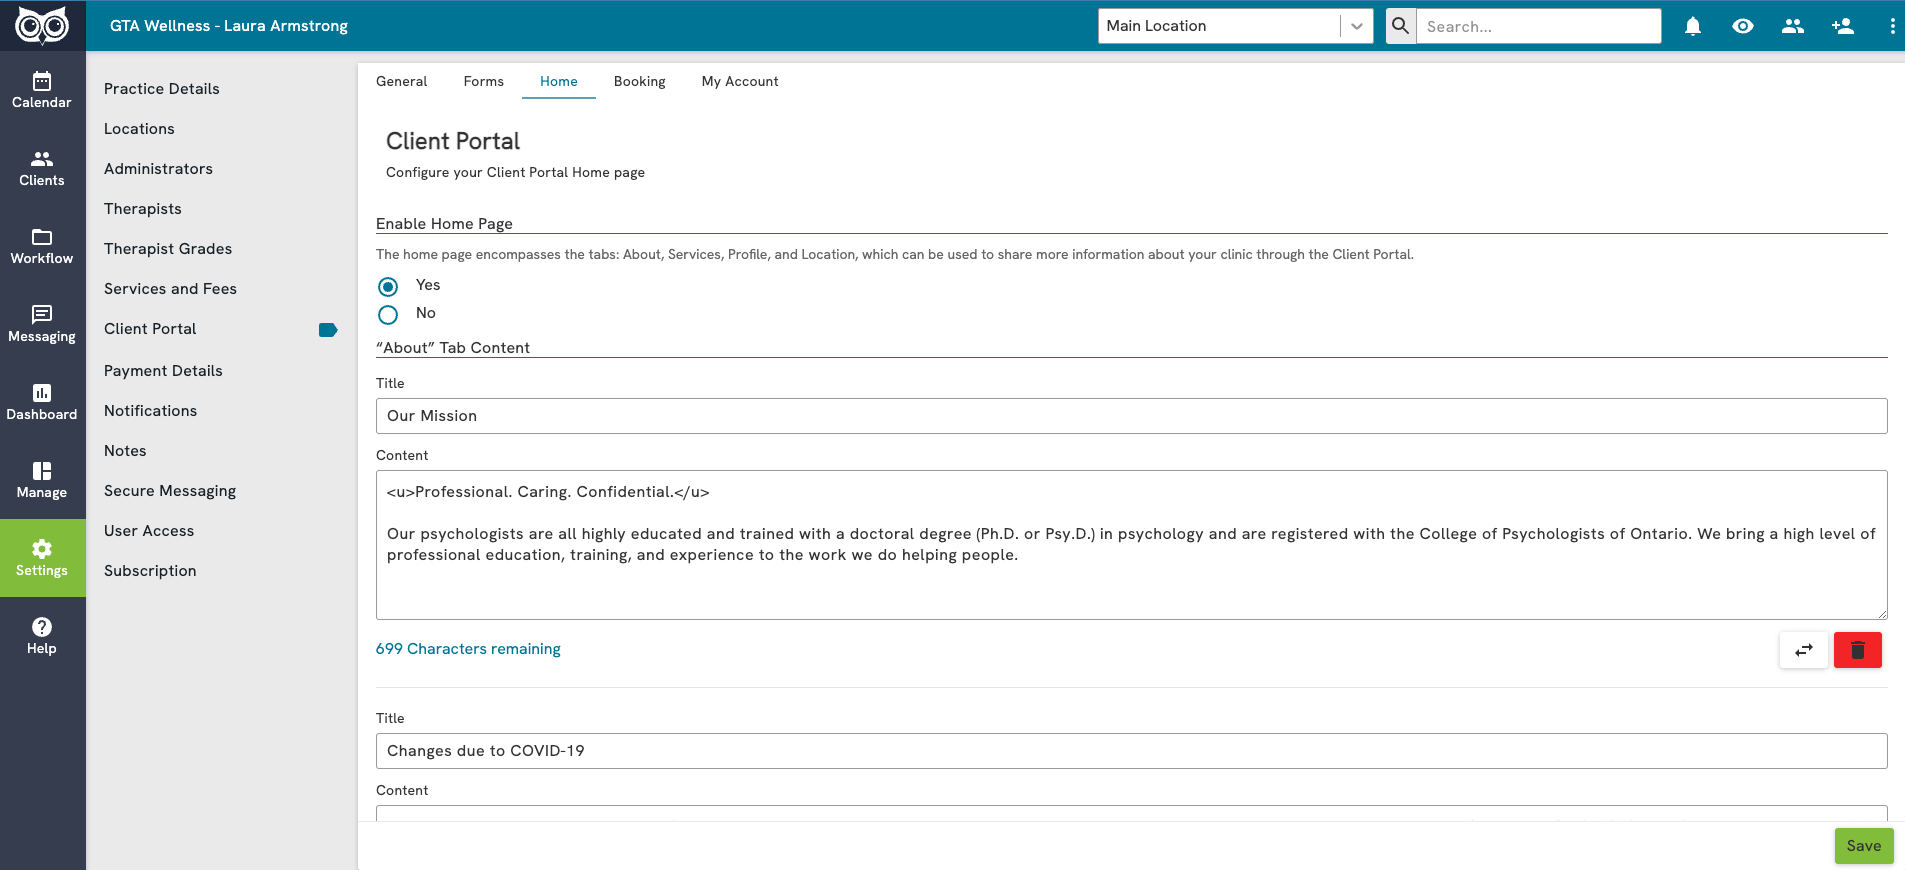
Click the Add Title and Content Block button to create segments of information on your Home Page. You can create as many of these content blocks as you need. We suggest using this area to communicate to clients who your practice is and what you provide.
For example, you could create a content block called Our Mission and share your practice’s mission statement with clients. Each content block must have a title and is limited to 1024 characters total.
The content fields in Settings > Client Portal (Home and Booking tab) now support basic HTML formatting ie. bold, italic, and underline for further customization. This will allow you to call out important details on the client portal for visitors to see
A quick google search for “HTML Formatting” will show you the elements you need to include in your content to make the text appear as desired. 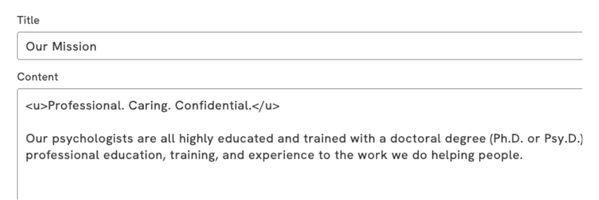

Other areas of the Home Page that can be customized include:
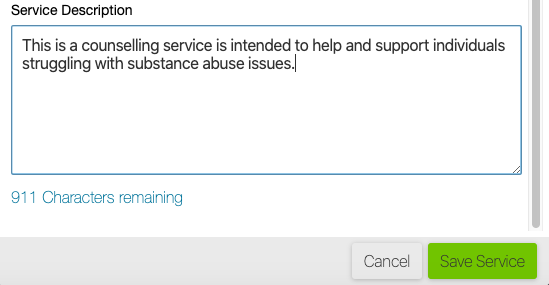
- Services: All of the Services offered in your Online Booking are displayed here. You can add Service Descriptions to each service offered by going to Settings > Services & Fees, and then entering a description in the Service Description field beneath the availability settings.
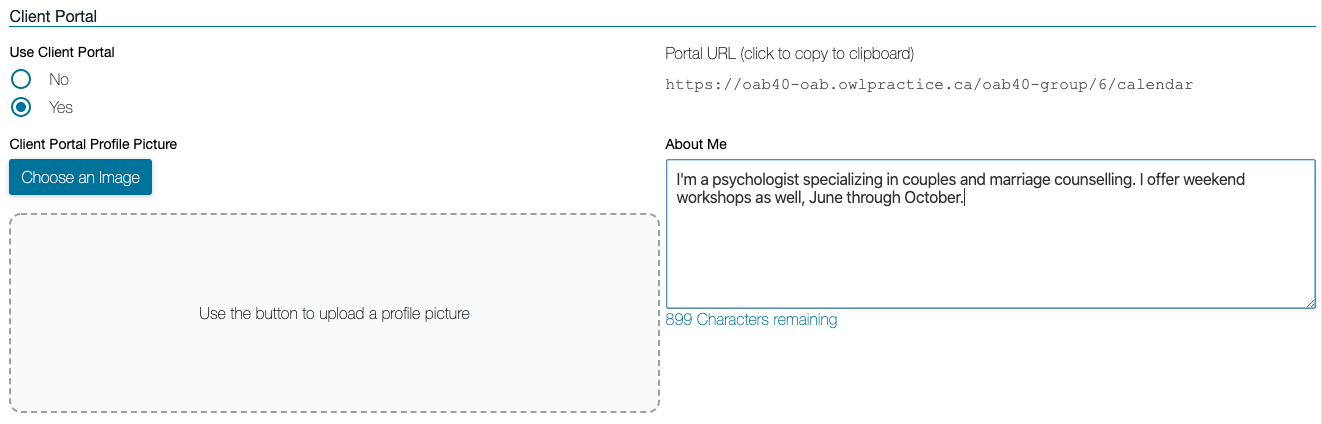
- Our Team: All of the Therapists at your practice will be displayed here, along with their Profile Picture and About Me bio.
Each Therapist can create their own unique About Me bio. Profile Pictures and About Me bios can be edited for each Therapist Profile by going to Settings > Therapists and editing the profile. Any text input into the About Me section will appear on the Client Portal site alongside the therapist’s profile. There is a character limit of 1024 characters for this section.
The About Me bio also appears next to the therapist’s name when they are selected during the appointment booking process. - A profile picture can be uploaded in the therapist’s profile as well, which will appear as a circular avatar for the therapist in the Client Portal. Profile pictures can be selected by clicking the Choose an Image button, or can be dragged and dropped into the space provided in the Therapist Profile.
It is not required to have a profile picture, but it is a great addition to your site. Therapist’s who do not wish to include a profile picture will simple have an avatar of their first initial appear next to their name on the site. - Locations: If you have more than one Location, this tab will display them here alongside their descriptions. Each location can be given a unique Location Description by going to Settings > Practice Details > Basics and entering the information into the field provided. You can change the description for each location from this page by selecting the location using the filter at the top of the page.
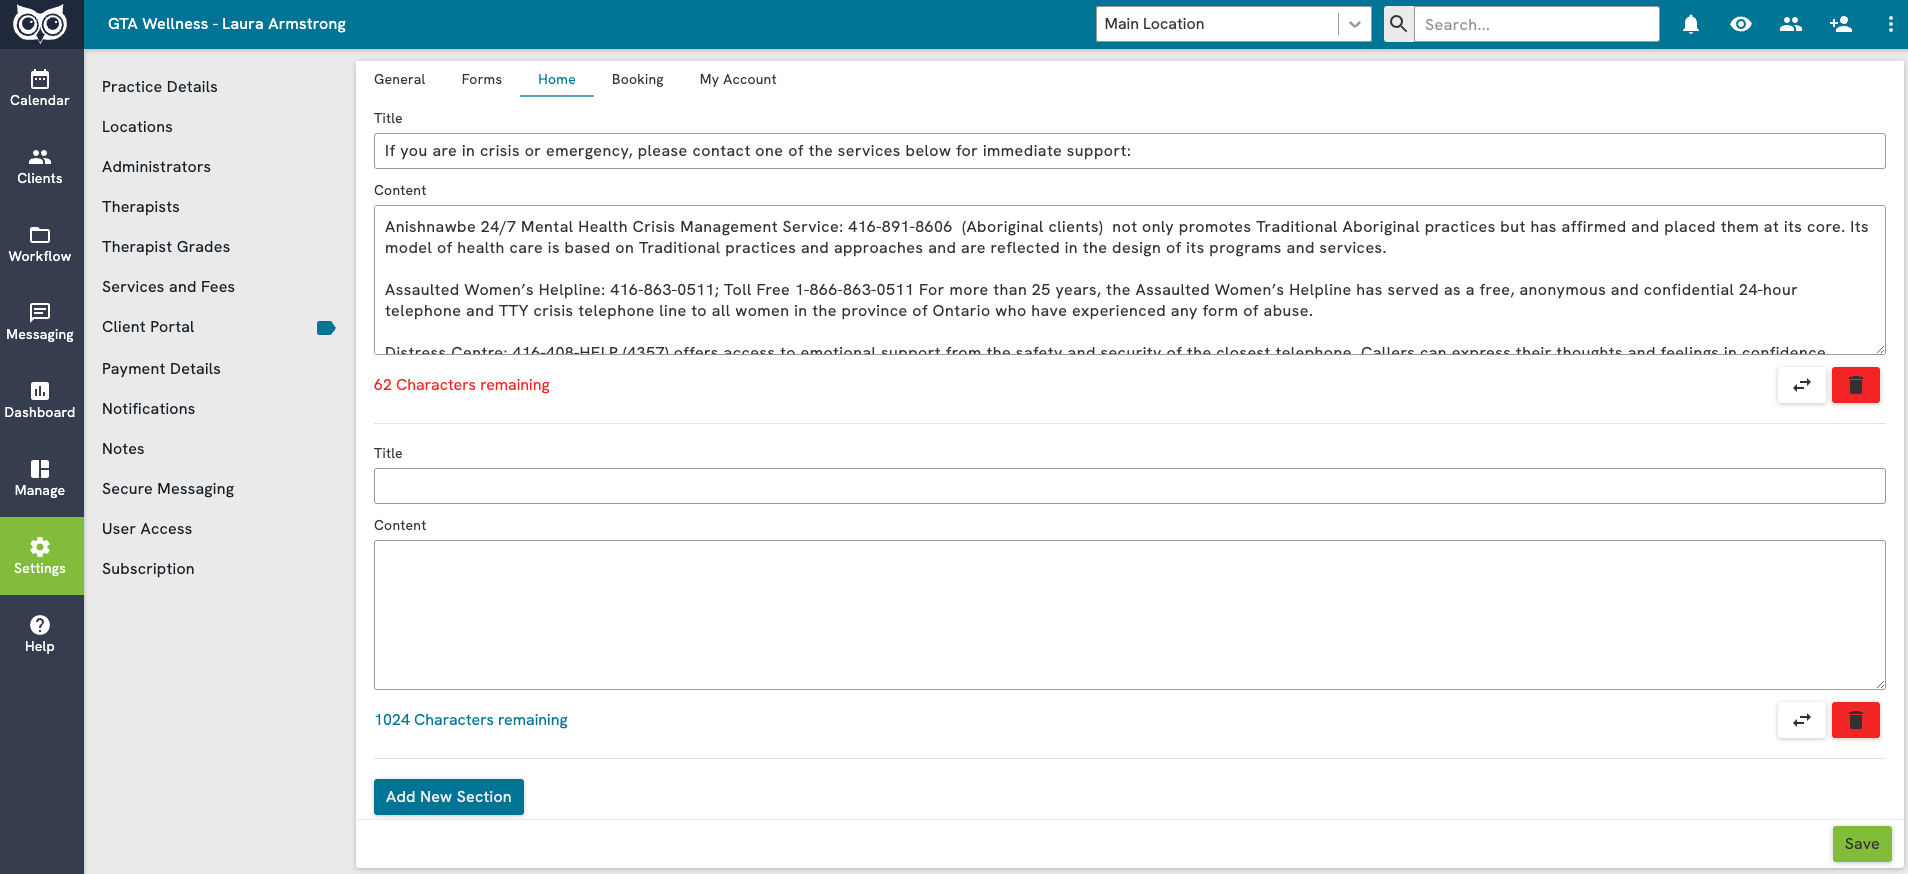
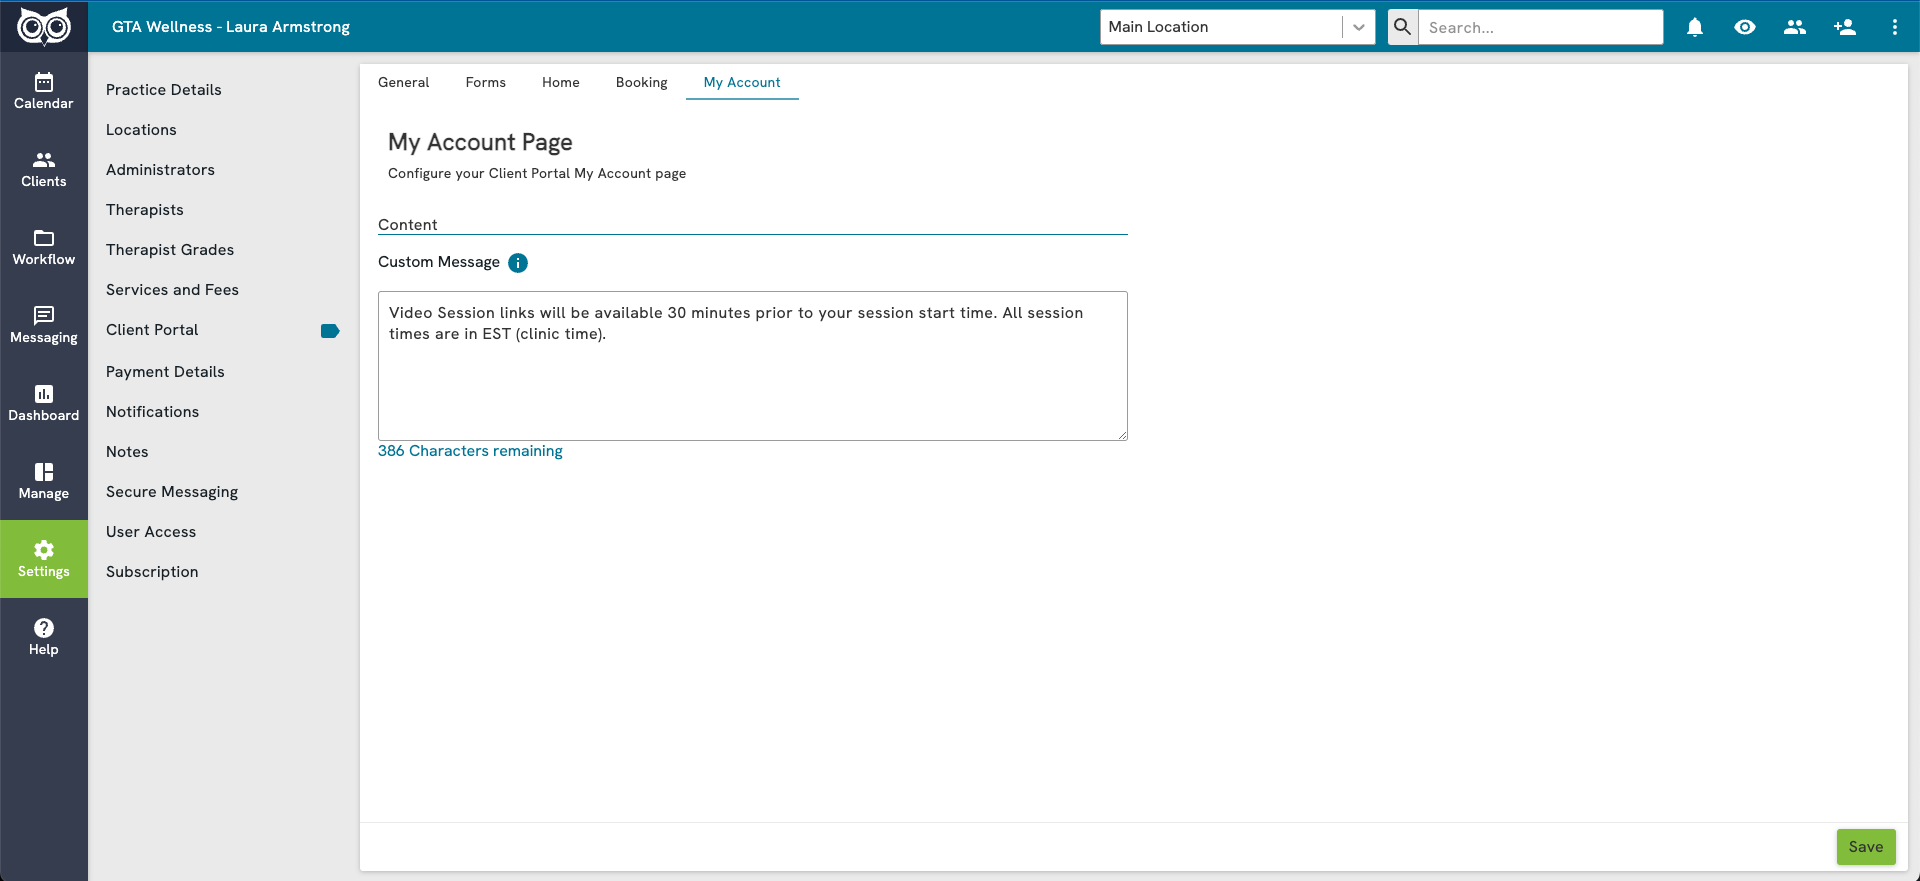
- My Account: We've added another place on the client portal where you can communicate pertinent details, such as how to add a credit card, join video calls, or contact the clinic. Head to Settings > Client Portal > My Account to set up an announcement message that will be displayed to all clients on the My Account page
- Booking: The Online Booking page on the Client Portal can also include customizable text. This area is located at the top of the Online Booking page under the “Your Booking” heading. It can be used to inform clients about important information before booking an appointment. Examples of what this space can be used for by clinics can include greetings, updates on COVID-19 protocols, or notes about in-person or online operations at the time of booking.
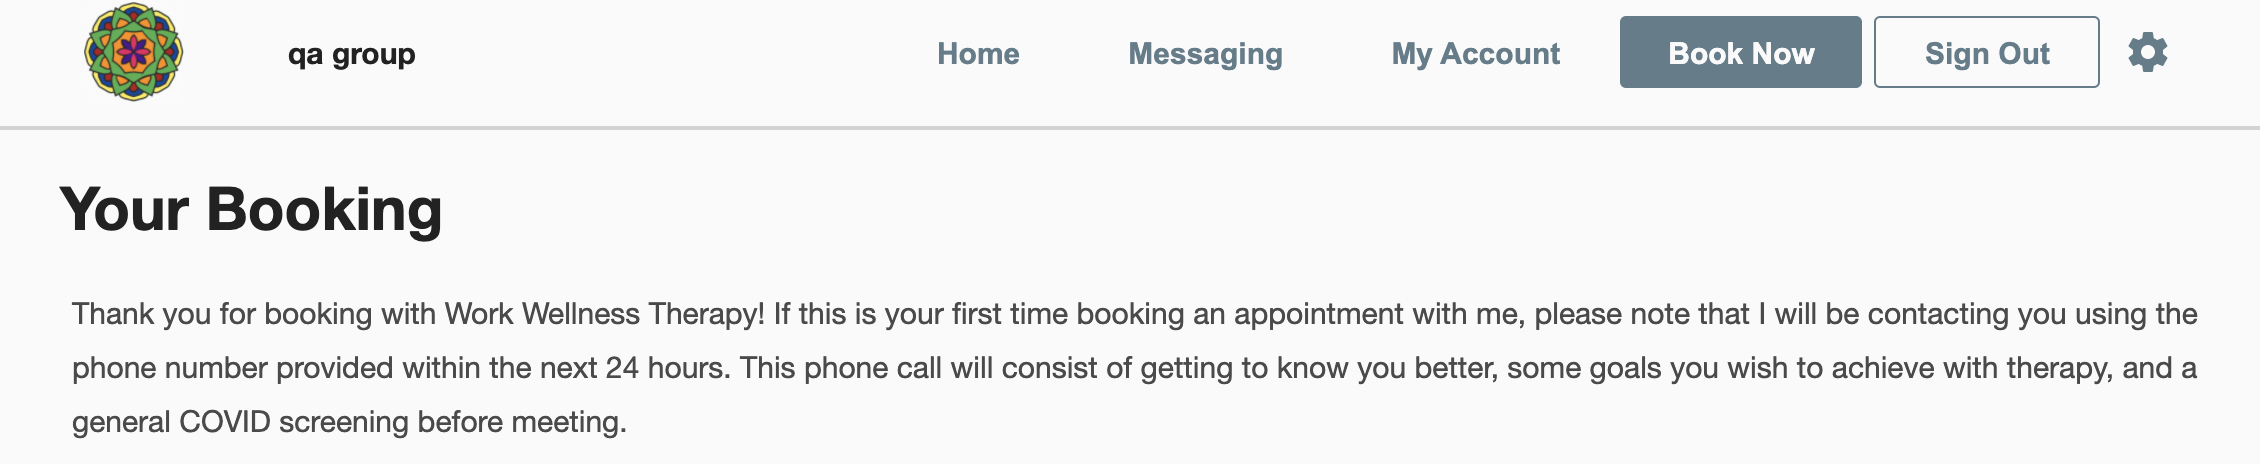
Text can be added or edited by visiting the Settings > Client Portal > Booking tab by Owners and Office Admins.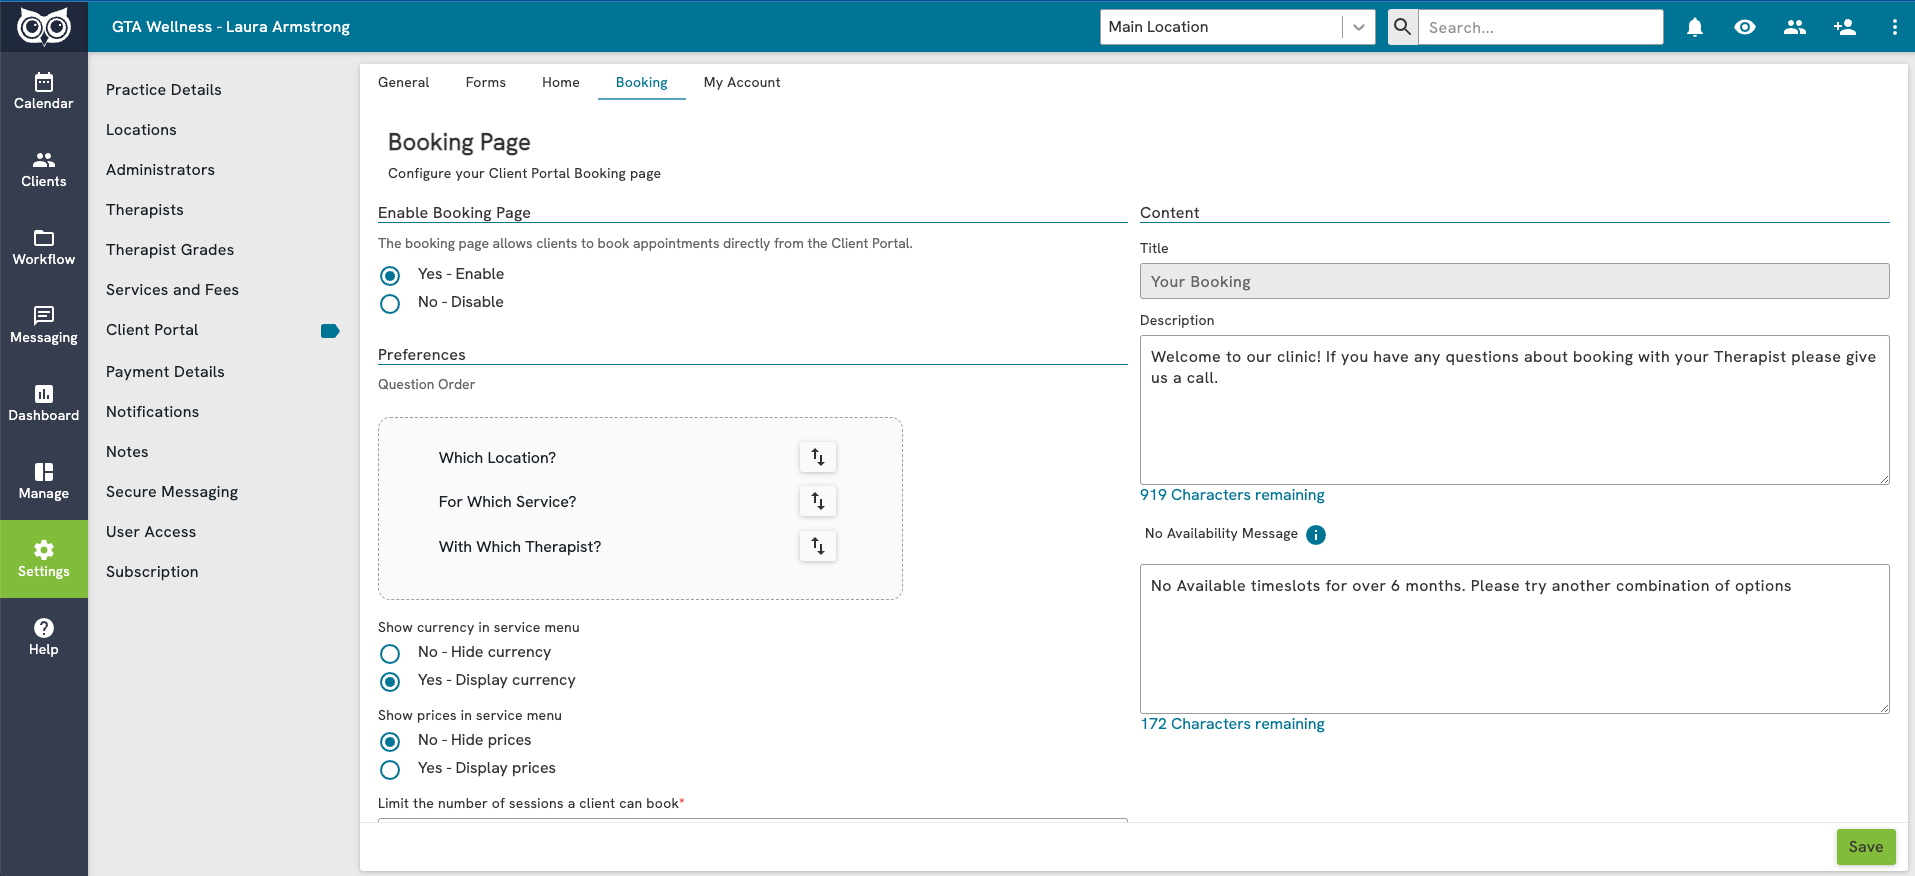
Please note that a total of 1024 characters or less can be typed into this text box. - On the same Booking tab of the settings, you can also customize the No Availability message that will be shown in the event that the client is trying to book for a service/ therapist combination that does not have availability in the next 6 months. This field has a limit of 255 characters


Client Portal Branding
You can further brand your Client Portal by setting the theme colour for your site any time you wish through your clinic account by going to Settings > Client Portal.You can choose a colour for your site using Owl’s pre-populated colour options or by entering the Hex Code for any colour you wish to use. Simply click the option, and set the colour or input your Hex Code. The Primary, Secondary, and Tertiary options you see below the colour palette allow you to preview how the colour will look on the navigational button of your Client Portal site.
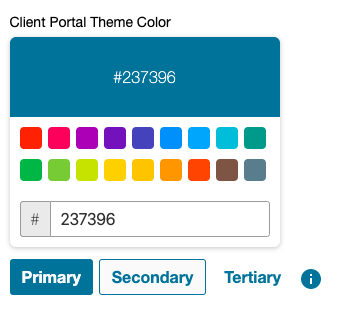
Then click the Save button on this page to apply the changes to your site. You can see from these examples how different the site can look based on colour choice.


This feature allows you to more seamlessly match the Client Portal site to your practice’s branding. Client’s using the site will always have the option to switch into Accessibility view if needed for better personal visibility.
When configuring your Client Portal please review this list to ensure that you’ve fully customized your site to include:
- Home Page - Content Blocks
- Home Page - Colours and Logo
- Therapists - Profile Pictures and About Me Bios
- Services - Service Descriptions
- Locations - Location Descriptions